Monday, January 31, 2011

Interview with the artist - Vanessa Hearn from Bead Up A Storm

By N Valentine Studio

Featured artist - Vanessa Hearn from Bead Up A Storm, Gloucester, England

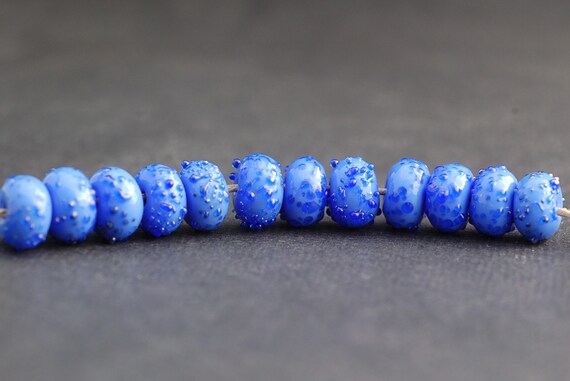
Vanessa, a fellow beadmaker has a wonderful Etsy shop! Great photos which can often be a challenge with glass. My favorite piece of hers would be these "Lilac Wine" beads, I have always been a fan of round beads and these little round beads have tons of color!


How long have you been working in your medium?
Almost two years - but with a seven month break while I had no studio after we moved house. I felt like I had to start from scratch again as I'd only been making beads for seven months when I had to pack up my torch. But I used the time soaking up information online and stocking up on glass!!

What drew you to this medium?
I have always loved beads. I was a seed-beader and saw Martin Tuffnell of Tuffnell Glas (a major British glass supplier) demonstrating at a bead show. I was transfixed and enthralled at the idea of making my own. So I got a starter kit, there and then!

What is your favorite thing about your art?
Melting glass is really magical, to turn a solid rod of glass into a flowing state that can then be shaped into a bead is always exciting. I love to play with the reactions between different colours and the beautiful effects of silver-rich glass.
It's highly addictive - ask any bead-maker!
I also love the meditative state that I find myself in, making beads helps me relax and fills my creative needs (which often get overlooked as I have a three year old son who takes most of my time!).

What's your favorite piece?
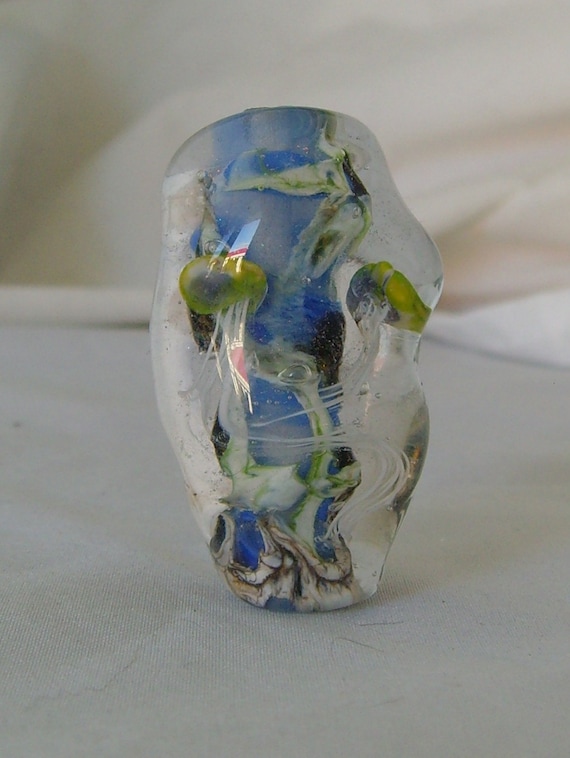
I'm not sure I have one. I am proud of my gazing beads and this winged heart.


What's the hardest piece you've ever made?
I find shaping my gazing beads a challenge, purely because of the size of them. Clear glass is stiffer than opaque and when they get to a certain size, shaping the glass gets tricky!

What's the one favorite tool you cannot live without?
Probably my graphite paddle, or my old vegetable knife!

What's your favorite thing about your workspace or studio?
I love everything about my studio. It's my sanctuary.

What is your other craft?
Bead-weaving. I also dabble with silver.

Who or what inspires you?
I find inspiration in the usual things that inspire many of us - from nature and textiles to holiday photographs and very often, films!
I enjoy working on commissions as they challenge me to make beads to someone else's inspiration.
I am in awe of the work of many glass artists, the styles and talent of Michael Barley, Andrea Guarino-Slemmons, and Kristina Logan particularly appeal to me.

What's your favorite inspirational saying?
Whatever you dream you can do, begin it. Boldness has genius, power and magic in it. Begin it now! ~ Goethe

What's one thing you've never done you always wanted to do?
Take a class with one of my favourite glass artists.

The SATeam blog features artisan handmade creations by the etsy starving artists jewelry team. SATeam members create handcrafted jewelry and beads. More information about our team and its current etsy shop owner members can be found at SATEAM.etsy.com.

Sunday, January 30, 2011

SATeam Blog Carnival - January 2011

Yes, it's blog carnival time again for the Starving Artists Team.  What is January's topic you ask?  This month, our participants were given this question to ponder:  "What is your favorite material and why?" 

To find out what our members had to say about their favorite material, please follow the links below. 

O'Refined

Galadryl Designs

Island Girl

Bead Sire

The FamiLee Jewels


Featuring artisan handmade creations by the Starving Artists jewelry team. SATeam members create handcrafted jewelry and beads. More information about our team and its current shop owner members can be found at SATEAM.etsy.com and here on ArtFire.

Saturday, January 29, 2011

Jewelry Photography Part 1


We've all seen and admired, the photographs of jewelry pieces featured on this blog. And you may be wondering how do they take such great photos? Quite frankly, that's something we struggle with every day except for the really rich members who can afford professional photographers for each piece they make...which means all of us take our own photos.

Good photographs are an absolute necessity to sell on the internet. The customer has to be able to see exactly what they want to buy. They don't want any "surprises" after opening their package when it arrives. Out-of-focus images, wrong colors, an image not showing parts of an item: all things affect sales. So let's see what makes a good photograph. Next week we'll look at what goes on after that photograph is taken from the camera before it's posted on a web site.

Here are three different solutions to the same problem from three members:

Lighting: How to get the right light to show off the piece as nicely as possible and not affect affect the colors? Haven't we all bought something in a store only to find the color is different in daylight? So, photographers need a light source that is near enough to daylight. Yes, there are "daylight" bulbs for those of us who don't have enough sun. And we need to aim it where we want it. And we need to control shadows. Details, details...

Here's a set up by ShinyAdornments
Her set up (red arrow not included) uses natural light:


And her results:


Here's a different one by Madame Magpie's Shiny Things


And her results (notice she uses a wine glass as a prop):


Here is a set up by TJRJewellery


And his result:

Background: How to show off all this lovely jewelry? How can we make it as appealing as possible and avoid the "Huh? Whazzat??" when the photo is posted on the net? As you can see each artist has their own way of solving the problem. Some use props like a floor tile with interesting texture or a wine glass or even nothing at all, BUT the final result is a beautiful image of their jewelry.


Camera: Do we need special cameras? Camera choices vary from artist to artist. What we do need is to learn how to use the camera we already have. If you have ever taken photos where things are out of focus you have probably wondered why. It's even harder to get very close to an object and keep it in focus. For that, we use the "macro" function of a camera. With macro we can shoot just inches from a piece and get the whole thing in sharp focus.

Here's some of TJR's choice of camera and equipment (in his own words):
- Current set up is a vintage Photogenic Machine Company Porta-Master 400 flash unit, a Canon EOS 20D, a Canon 100mm macro lens and a Manfrotto tripod with a ball head (to allow for camera rotation) - all were bought used (if you know someone who is into photography professionally or at an amateur level belonging to a camera club, you might be able to obtain some of their back up equipment at a reasonable price - the only equipment likely difficult to get cheaply will be the camera lens as they hold their values as they typically can be transferred from camera to camera.
- Camera directly attached to the flash unit using a PC sync cable, and I use the flash mode setting on my camera (I do not use the on camera flash for my photos).
- Camera set-up/settings I like to use: I shoot in manual mode, always manually focus the jewellery in the picture (to keep the area I want in focus), picture should take up 1/2 to 2/3 of viewing frame, take pictures in RAW format, use the camera timer to take the pictures, use f/13 for aperture, use shutter speed of 1/250 of a second, use ISO 100 (to avoid noise)
- Using a grey card for colour correction is very important - take a shot under your normal lighting set up with a grey card in the picture frame somewhere (you only need to use the grey card for the first photo you take). Import the photo to Photoshop and go to IMAGE -> ADJUSTMENT -> LEVELS. Click on the middle eye dropper to set the grey point, move the eye dropped over to the grey card and click on it (colour should instantly improve). Save this white balance adjustment (using the save button) and you can instantly correct all your other photos taken under the same lighting conditions by loading this white balance adjustment for all subsequent photos. You can further play with your white balance if you choose by adjusting the small triangles below the histogram/"input levels" graph.

As you can see, TJR's list is very complete and detailed for his needs.

Other equipment: One reason your pics may have been blurry was because the camera shook just a bit. So, we use a tripod to hold the camera as perfectly still as possible. See the list above for a very complete list of what TJR uses.

TJR mentioned photo editing above and that's what we'll be discussing next week.
(And yes, that's me taking a pic.)

Thursday, January 27, 2011

January Challenge


Every month members of the Starving Artists Team are invited to stretch their skills and their imaginations by participating in a specific challenge.


January's quest was to try something new for the New Year.

What could we come up with using a new technique, a new material or a new cool new tool.

Santa brought TheFamiLeeJewels some leather tools that included a multi hole punch and rivet setter.


I turned reclaimed salvage store leather goods into these new cuffs. In keeping with the spirit of recycling the paper that forms the background of the resin pieces are stamps from Paraguay. They were a lovely bonus from when our very own Colla sent her charms for the Holiday Wrist Candy Bracelet Giveaway.


Talk about cool tools! Get ready to drool.


Galadryl's Dad got her a rolling mill for Christmas as well as a "Belichtungsbox" (a light box for etching metals).


Sylvia made fantastic patterns on copper and sterling silver then turned those patterns into earrings.


Lynne's creativity was sparked by a set of oval mandrels for jump rings. Lynn hand cuts rings for chain maille projects. Look at the beautiful bracelet and necklace our IslandGirl made by combining her own glass beads with round and oval jump rings that she cut to complement them.


Brave Caron accepted the challenge of working with itty bitty seed beads. Her loom arrived just in time. I think that Beadsire can add another talent to her list. This colorful and intricate cuff was her first!


Are you ready for a challenge?


Not a challenge with voting and prizes,

but one to stimulate your creativity

and make you think in a different way?

I invite you to play along in February when our challenge will involve Love and Romance of course.

 
Written by Bonnie Lee

Wednesday, January 26, 2011

Bead Sets and Inspirations

There's something about the allure of a set of handcrafted beads. The shapes and intricate color combinations create endless possibilities...


But what to do with all of these lovely bead sets? Well no one can go wrong with a dainty pair of earrings:


Or perhaps a sea-swept bracelet?


But beads are not only for jewelry - they can even decorate your creative writing!


What's your favorite way to use handmade beads?

Featuring artisan handmade creations by the Starving Artists jewelry team. SATeam members create handcrafted jewelry and beads. More information about our team and its current shop owner members can be found at SATEAM.etsy.com and here on ArtFire.

Tuesday, January 25, 2011

Field trip to the museum


"Ok, kids. You know the rules. No running in the museum, no touching the paintings and please don't be so loud, we have to think of the other visitors, too."

Nah, don't worry. This little trip will be very laid back as we will visit a virtual museum now. You don't have to be afraid of touching the paintings, either. Well, unless you don't like the fingerprints on your monitor, that is. Oh, and the paintings I will show you are available for buying, you don't have to settle for the little refrigerator magnets or a print. You can own the real thing.

Now, what are those paintings I keep talking about? They have not been created by man, but by nature. I mean jasper. I'm by no means an expert on the subject of jasper and to be honest, for years and years I didn't even look it closely because I always was pretty much a sparkle girl.
Enough talk, let's have a look instead.

Let's start with a stunner by 2 Belles and a Bead. It's called Cherry Creek Jasper. What I see is sun falling through the leaves in a wood.


It's not hard to see where this jasper got his name from, California Poppy Jasper. You'll find this beautiful pendant in the studio of Ava Designs. Imagine going for a walk at dusk. I think that is what poppies would look like then.


A favorite of mine is Picture Jasper. It speaks of desert, sand dunes, oases or paths in a dry wood. I wouldn't be surprised if any minute a camel would show on these lovely earrings by Kristi Bowman Design!


African Autum Jasper is the star of this impressive pendant by Angie's Jewelry Design. This one really reminds me of an abstract painting with rich earthy colors.


Oops, seems the museum is closing down for today, but maybe you'll like to come back some other day when I found more paintings for you. It would make me very happy.

Featuring artisan handmade creations by the Starving Artists jewelry team. SATeam members create handcrafted jewelry and beads. More information about our team and its current shop owner members can be found at SATEAM.etsy.com and here on ArtFire.

Monday, January 24, 2011

Interview with the artist - Olga Cuttell from Ola Design

By N Valentine Studio

Featured artist - Olga Cuttell from Ola Design, Vancouver

Olga is another non-SATeam member whom we are featuring on our blog. It's really nice (and inspiring) to see other mediums and hear what makes those artists tick.

I adore the lightness and whimsy in Olga's work. My absolute favorites are her birds. You'd think being a horse person I'd be drawn to her horses which are also lovely. But her birds make me think of a warm spring morning, sun shining and birds chirping. They give me such an inner warmth I could look at her shop all day. My favorite is her Spring Warble.


How long have you been working in your medium?
Not that long actually. Recreationally, I've done pencil sketches and the odd illustration for years, but my ink technique - which is, by far, the most prominent among my professional pieces - is something I discovered only about 3 years ago.

What drew you to this medium?
Many things. It's more versatile than water-colour (allowing layered compositions and shorter drying times). It also tends to generate a more vivid final colour output which is key to generating my themes and is a source of joy as an artist.

What is your favorite thing about your art?
See above. Colour and its ability to tell an emotional tale. I tend towards the whimsical and I actively seek out themes that raise the spirit.

What's your favorite piece?
Impossible question. The Sisters is one of my earliest ink pieces and I still come back to it ... but even then ... my favorite piece is the one I'm working on at the time.


What's the hardest piece you've ever made?
Anything commissioned. The vast majority of my art I paint for myself and hope people like it. When I take on a commission, the pressures are different; that is to say there is pressure, and so I have to change my mindset and work harder to relax.

What's the one favorite tool you cannot live without?
Love.

What's your favorite thing about your workspace or studio?
My favorite thing is also my biggest headache sometimes. My studio is in my home which is convenient and keeps me close to the things that are most important to my life. Of course it also makes it harder to step outside my life sometimes. My husband and son are great about giving me space, but my two-year-old daughter ... not so much.

What is your other craft?
Pottery. I love the textures and having a piece that you can use in your home. Home-made pottery, even amateur work, has a wonderfully unique character about it that never grows old with me. I have great admiration for those who have developed both skill and style when working the clay.

Who or what inspires you?
I love the natural world and believe it to be both an inspiration and an expression of living art. I'm also captivated by the inherent strength that I believe lives in the hearts of the world's women. We are beautiful at all ages, and in all shapes and colours. I like to remember that and I see evidence of it every day.

What's your favorite inspirational saying?
If you love something, let it go. If it comes back to you, it's yours. If it doesn't, it never was.

What's one thing you've never done you've always wanted to do?
You need more space in this blog ... If I have to choose just one thing, it would be skydiving. We've got some friends who do it as a lifestyle choice (they do instruction and videos to supplement their addiction) and it sounds like everything I've ever wanted in a hobby - excitement, challenge, fellowship. Expensive, though.

The SATeam blog features artisan handmade creations by the etsy starving artists jewelry team. SATeam members create handcrafted jewelry and beads. More information about our team and its current etsy shop owner members can be found at SATEAM.etsy.com.

Sunday, January 23, 2011

Welcome More New and Returning Members

There are some additional new and returning members to the Starving Artists Team to introduce again this week.  Please join me in welcoming these members. 

New Members:

Cathleen from McLain Jewelry makes one of a kind pieces, with a special focus on sculptural pins.  She works with sterling silver, bronze, brass and copper and gives her pieces wonderful patinas. 

I love this sterling silver and married metals pin brooch.  The rich colours of the metals contrast beautifully with the purple dichroic glass accent. 

Sterling Silver and Married Metals Pin Brooch by McLain Jewelry

Becky from Redbird Jewelry lives in Surrey in the UK.  She works primarily in silver and copper  and uses wire to make many of her own components.   

I love this necklace.  Flow is the perfect title for it, don't you think?  It's simple, elegant and those beautiful curves make it wonderfully feminine.

Flow - Sterling Silver Necklace by Red Bird Jewellery


Returning Members:

These ladies are not brand new to the SATeam, having been members in the past.  But they have been away from the team for a while and we are very happy to welcome them back to the group. 


Kay from Popnicute has recently moved to the US from Indonesia.  She creates unique jewelry using argentium silver and copper wire and sheet. 

I love how light and airy Kay's Autumn Flowers Necklace looks.  The crystals give this lovely copper piece a bit of extra bling. 

Autumn Flowers Necklace by Popnicute

Heather, from Studio DTQ has had a lifelong love affair with jewelry.  A winter of cabin fever and a plastic necklace and earring kit belonging to her young daughter eventually led to her the wonderful world of creating her own jewelry. 

I love the bright colour of these Luscious Candy Jade Copper Earrings.  You might not typically think of pairing this colour with copper, but Heather demonstrates here that this is a winning combination. 

Luscious Candy Jade and Copper Earrings by Studio DTQ

Featuring artisan handmade creations by the Starving Artists jewelry team. SATeam members create handcrafted jewelry and beads. More information about our team and its current shop owner members can be found at SATEAM.etsy.com and here on Artfire.

Saturday, January 22, 2011

Kumihimo Interview: Part 2 Sharing What You Love

Last week I wrote about how I found kumihimo, Japanese braiding, and how it led me to working with copper which in turn led me to a love affair with copper itself.

This week, since I have already explore copper a bit (and will do so again in the future) I thought I'd talk about what some of us do out of love of our crafts: teaching. Many members of the Starving Artists Team have taught classes. I was asked to teach a class on kumihimo, Japanese braiding, at the local bead shop BeadsontheKennebec.

When I teach I use the foam disk. It's the best for beginner braiders since it has notches for cord placement. (The maru dai does not which makes things harder; you need to know placement and keep it while braiding with no indication of where the cords go.) Here's what my disk looks like.


This is how I set it up. That black thing is my high tech solution for a counterbalance needed for keeping tension of the developing braid. It's a small bag that holds enough pennies, washers, and small batteries to get the weight right. I always keep it this way because I'm teaching how to braid, not to make a finished piece. They need to learn the movements. It took a year or so for class members to accept that. But they did and one day a class member walked into the store and told the owner that she had been asked to make a couple of necklaces for her coworkers. The sense of satisfaction I felt was incredible.

Now here's some important advice for teachers: it's good to have written directions to hand out so class members have something to take home. It's bad when the directions are incorrect! In my very first class I was showing how to start and a nice lady looked a bit confused and said "but the directions say the other way..." Lesson learned here: the first class teaches the teacher. I finally came up with a list of "Things I Wish I Had Known Earlier". So far the list is up to 25 things and still growing!

Some students must learn but need to overcome a disibility; one woman was not able to use both hands well due to a stroke. And it's so easy to get off topic and start talking and forget why they are there. Beware though, if you teach, expect students that aren't always so nice. Some really wanted to shop for beads (couldn't blame them but they paid for the class) and wanted to hurry through in an hour. Some think they know more than the teacher regardless of the subject! Some argue because "isn't there an easier way to do this?". But all things considered it's fun to teach.

So, the end of my interview now. But not the end of learning and having fun sharing.

Thursday, January 20, 2011

The Jewel Box

For as long as people have adorned themselves with jewelry there has been the need to safely store these items in receptacles that may protect them from exposure to elements that may affect the finishes and degrade them. Early on only the richest and most privileged needed to be concerned with such matters. The use of ceramic jars may very likely have been the earliest form of jewelry storage. The Egyptians were most likely the first to fashion boxes for the storage of gems and jewelry adornments.

The Industrial Revolution and the mass production of many products including jewelry ushered in the demand of common folk for jewelry storage. The first manufactured jewelry boxes were made of cast lead base metal, often with electroplated finishes of copper, silver or gold. Through time we have seen incredible diversity in the materials and designs used in the crafting of jewelry boxes which are eternally sought after by girls and women from 5 to 80 and beyond.


I recall my first jewelry box was a recycled cigar box, after a couple of years it was elevated to a musical box with a ballerina inside…I believe it was made of cardboard. There are jewel boxes made of leather, exotic woods, glass and even some that are encrusted with gemstones or other sparkling embellishments. You can find jewel boxes in all shapes and sizes…some designed for function with multiple compartments, drawers lined with anti-tarnish fabrics and mirrors and other that are sought after more for their form and collectability. Today my favorite jewel box is actually a jewelry armoire that lets me hang necklaces without getting them entangled with each other and offers a variety of storage options. I also love the little trinket boxes I have collected that hold my favorite earrings and small pendants that I enjoy wearing more than occasionally. My favorite pieces of jewelry are items that have been artfully designed, handcrafted, limited in availability and made with high quality standards…just like the jewelry crafted by the artists and designers of the Starving Artists Team.

What’s in your Jewel Box? Looking for unique pieces to add to your collection? Have a look at some SATeam creations….


Featuring artisan handmade creations by the Starving Artists jewelry team. SATeam members create handcrafted jewelry and beads. More information about our team and its current shop owner members can be found at SATEAM.etsy.com and here on Artfire.

Wednesday, January 19, 2011

Supplies From the SATeam

Are you running low on supplies for your latest creations? Check out these new supplies from the SATeam! Click on the links below the images for more information.


The SATeam blog features artisan handmade creations by the Etsy Starving Jewelry Artists team. SATeam members create handcrafted jewelry and beads. More information about our team and its current Etsy shop members can be found at SATEAM.etsy.com